
Published: 4 July 2008 / 4.29am
It is really exciting to collect Pitcher Plants. However, after a while you will have the urge to try and propagate your own plants to increase your collection. Propagating your plants would also help you save money. It is also exciting and fun. There are basically four ways to propagate pitcher plants. I will explain more in the paragraphs below. Enjoy…
SEED
This is the traditional method and Mother Nature’s way to propagate Pitcher Plants. However, this process requires patience and “long-suffering”. This is because there are male and female Pitcher Plants and both male and female plant needs to flower at the same time. Finding a male and female plant is hard enough because most plants sold in nurseries are male plants. There is also no difference in the physical appearance of male and female plants unless they flower. Waiting for them to flower at the same time is also a problem and it is out of our control. It depends entirely on the whims and fancies of the plant.
When both male and female plants start to flower, pollen from the male flower needs to be transferred to the stigmas of the female flower. This can be done by dabbing the male flower on the female flower or shaking the male flower over a piece of paper so that ripe pollen falls off on the paper. Using a paintbrush, collect the pollen and rub the pollen onto the female stigma. When pollination is successful, the female ovaries will swell, turn brown and crack open within a few weeks revealing the long slender seeds.
One important point to note is that Pitcher Plant seeds have a short shelf life. Sow them as soon as you can.
Step 1- Soak chopped up sphagnum moss in a diluted solution of insecticide and fungicide. This will kill any pest that may be present in the media. A lot of plantlets die shortly after germination because of pests and fungus. Place about 1 inch of the sphagnum moss in a tray. The potting media does not need to be deep as the seeds are tiny and their roots will not reach that deep anyway. If sphagnum moss is not available, you may use coconut peat. Other growers have had great success with coconut peat.
Step 2 - Sprinkle the seeds on top of the chopped up sphagnum moss and place it in a terrarium where humidity is high. If you do not have a terrarium, you may use those seedling trays specifically made to germinate seeds. There is a cover on top to keep the humidity high. Make sure the seeds receive bright light and warm temperature. You may sow the seeds on your current Pitcher Plant pots where they are thriving or place the seed trays in your greenhouse or shadehouse if you have one. If the environment suits the mature plants, it would be appropriate for the seedlings.
Step 3 - Make sure the potting media (sphagnum moss) is always wet. If possible water them from the bottom using the tray method. If you pour or spray water on top of the media, the water might wash the seeds into the media. The little plantlets might have difficulty reaching out of the media if they are buried under it. Then, they will not receive the light that they need and will die. Watering from the top when the plantlets have germinated will also injure or break their tiny and fragile stems or roots.
Step 4 - Now, all you have to do is just to wait. Leave the seeds alone. I know it is tempting to fiddle with them or move the tray around when you are trying to look for baby plantlets. But if you do that it really does not help the seeds in anyway but might disturb their growth. Germination will occur from 3 weeks to a few months depending on the freshness of the seeds and how well you treat them.
Step 5 - Once the seeds germinate, allow more air circulation around the plantlets, but please do this gradually or the seeds will wilt and die. This is more applicable if the seedling are placed inside a terrarium or seed tray where the humidity is very high. Air circulation will prevent damping off fungus from attacking the baby plantlets. This fungus looks like a layer of white hairy cotton wool on top of the media. Pests would also love to munch on your plantlets. So scrutinize the media for any pests. Use a diluted insecticide solution if there are any pests in the media.
Step 6 - Transplant the plantlets into individual pots when they start to crowd each other in the seed tray. Be careful not to disturb the roots. The plantlets will take 2-4 years to reach a reasonable size.
DIVISION
Adult Pitcher Plants will occasionally form new basal rosettes and new shoots from under the surface of the potting media near the base of the plant. Once these basal rosettes start growing into a vine, they can be separated from the original plant using a sharp knife or scissors. These will continue to grow as a separate plant because they already have roots. Give them more shade during this time and mist them once or twice a day. Once they start growing new leaves, you can grow them in a normal way. If the basal rosettes do not have roots yet, they can be treated as a stem cutting. The survival rate using this method is very high and usually does not fail.
However, you still have to wait for new basal rosettes to form. Sometimes it breaks my heart to dig out my favorite plant and cut it up. Even though this method rarely fails, there is still a “tiny” bit of risk that both the original plant and the basal rosette plantlet would die from shock due to the “surgery” that I perform on it. I will only use this method when I have a few pots of the same species.
STEM CUTTING
This is my favourite way to propagate Pitcher Plants… simply because it is easy and there is no risk of killing the original plant. More importantly, I am also able to get a large plant in a relatively short time compared to propagating plants from seeds.
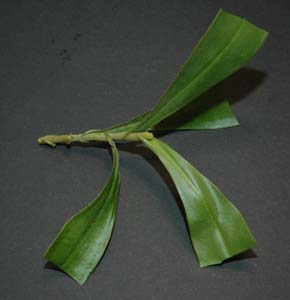
When the main stem has grown large enough or has other stems growing out of the plant at one place or another, the growing stem can be cut into sections with 2-3 leaves per section. Do not trim back the plant too close to the ground or the plant will die. Leave at least 4-5 leaves at the base of the original plant. Once the growing stem is cut, the plant will grow new stems from dormant nodules or shoots from the main stem just above each leaf base. So don’t worry, your plant will look beautiful again. New leaves and stems on the cuttings will also grow out of these dormant nodules or shoots.
Step 1- The stem cuttings should be washed with water. Add a little fungicide in the water to prevent fungus and mould from killing the cuttings. Cut the stem into sections with 2-3 leaves each.


Step 2 - Cut the leaves on each stem into half. This will prevent dehydration or loss of moisture. Loss of moisture will cause the leaves to dry out before the stems grow roots. When that happens the cutting dies.


Step 3 - Cut the bottom of the stem diagonally so that there is a maximum diameter of the cut area. New roots will grow from this area. You may also cut the bottom horizontally and cut 3-4 verticle slits (about 1cm) to the end of the stem cutting. Roots will also grow from the slits.


Step 4 - Treat the cut area with rooting powder. Follow the manufacturer’s instructions. Be stingy with the powder. I realized that a lot of my cuttings do not root when I treat them with too much rooting powder. Vigorous growing species usually root without rooting powder.


Step 5 - Use plastic pots and sphagnum moss as the potting media. Wet the sphagnum moss. Use a pencil or stick to make a hole in the sphagnum moss. Make sure the hole is deep enough and wider than the stem diameter. This is because when you push the cuttings into the potting media, the rooting powder will brush on the sphagnum moss and will be lost if the hole is not big enough. Some growers place the cuttings in water. About 1-2cm of the end of the cutting is placed in water. This works well too.


Step 6 - Place the cuttings in the hole in the potting media and press on the sphagnum moss around the cutting so that it holds the stem in place.

Step 7 - Water the potting media again at this point. Place the pots in a terrarium or a clear plastic bag. The purpose is to provide a high humidity environment around the plant. Pitcher plants are able to live on their leaves, meaning, they do not depend solely on their roots to survive. They are able to absorb moisture through their leaves. The cuttings are also very sensitive to heat at this time. Full sunlight will cause too much heat to build up inside the terrarium or plastic bag. I use florescent lighting. Leave the lights on for at least 18 hours. DO NOT move the pots during this time. If you do, the delicate new roots that are trying to grow will be broken.

The cuttings should root within 1-2 months depending on the plant species and how well you treat the cuttings. You will know their roots are established when the cuttings grow a few new leaves. They can then be grown together with the other plants. Sometimes it is wiser to wait a little longer before repotting them because the stem cuttings are able to use the food stored in the stem to grow new shoots before their roots are form. If you dig them out at this time, you would have disturbed the growth of its roots. When this happens, they might die or take a longer time to grow their roots. I always wait until they have a few new leaves and pitchers before transplanting them. Either that or I just grow each stem cutting in its individual pot. That way I do not need to disturb them.
TISSUE CULTURE / IN VITRO
Tissue Cultured plants are plants grown under sterile conditions, usually within an air-tight, clear container such as a glass/plastic flask or test tube. The culture is grown in a solution of agar that has growth hormones, sugars and salts in it to manipulate and encourage the culture cells to grow roots and buds/shoots. The exact amount of the hormones used is very important or the culture will not grow properly. Because there are hormones and sugar in the agar, there is a high probability that fungus will grow and contaminate the culture. Therefore the container and the culture have to be sterilized and sealed tight.
There are several ways to start a plant tissue culture. The most common is from seeds, leaf sections and finally a more difficult technique of dissecting out a growth tip or apical meristem. Most of the Pitcher Plants you buy from plant nurseries are from tissue culture labs if they are not collected from the wild. With tissue culture, tens of thousands of plants can be grown in a relatively short time and at a relatively low cost. This also helps curb collection from the wild, as more plants are made available.
Some of my N. ampullaria and N. hookeriana cuttings have started to rot. But I have followed exactly the method that was recommended to propagate stem cuttings.
Comment by Aliamyz — July 4, 2008 @ 7:10 am
It could be due to the following reasons:
The cuttings are placed in a condition that is too humid and wet with very low light.
Keeping the base of the cuttings in a wet and humid condition is important to keep the cuttings alive. However, they need bright light. If they are placed in a dark corner, the cuttings will rot.
If the cuttings are also cut too short, they will not have enough food to survive and grow new shoots or roots. They will rot and die.
Comment by David — July 5, 2008 @ 2:46 am
So is there anyway to save it after a little rot in the top of the growing point?
Comment by Aliamyz — July 5, 2008 @ 9:18 am
Perhaps you could cut off the growing point and see if it give out new stems. All the best.
Comment by David — July 7, 2008 @ 12:47 am
Do you think Viking cuttings work well in water?
Comment by marvin1997 — August 31, 2009 @ 10:17 am
Hi marvin!
I have not tried rooting N. sp. vikings in water before as I prefered rooting them in media (personal preference). However, I reckon they will root well. N. sp. vikings are relatively vigorous plants and they are hardy. Should not be a problem. Do let me know the results once you’ve tried it.
Comment by David — September 1, 2009 @ 11:19 am
I am so happy to have found this site. My delemma. I have a pitcher plant approx., 1 year, I tried to seperate and replant in seperate pots. Within a week, my beautiful plant started to die, (leaves turned brown and the pitchers, dried out). I cut off all the pitchers and placed the plants under ultraviolet light. Now Im at a loss, the root/stems are brown. So, today I cut them all in pieces and dipped them into rooting gel, and placed in purified water. Please if anyone can help me save this plant I would be sooooo grateful. Thanks, LJ
Comment by LJ — September 30, 2009 @ 10:11 am
I am so sorry to hear about your pitcher plant. Most probably the roots were damaged when you seperated them and transplanted them. You’ve done the right thing to make cuttings. Now, we can only wait and hopefully the cuttings will survive and give you some plants to replace the mother plant.
Comment by David — September 30, 2009 @ 11:45 am
ANNOUNCEMENT:
A website has plagiarized this article of mine and has copied word for word and even include all my pictures for this article.
I have emailed them numerous times to remove the article from their site but they have remained unresponsive.
Comment by David — January 13, 2014 @ 4:58 pm